top of page

Blog

Welcome to the Soredenacho Photography Blog, where I, Nacho, share my experiences as a professional photographer based in Tokyo, Japan.


My passion lies in capturing authentic moments, whether through corporate event photography, portraits, landscapes, architecture, or street photography. This blog is where I document my journey, share insights from my photo sessions, and provide valuable tips on photography techniques.

What to Expect on This Blog

This blog will be a space where I share my experiences from photo sessions, discuss challenges I’ve faced, and provide behind-the-scenes insights. I’ll also share tips on camera settings, lighting techniques, composition, and post-processing.

Whether you're a fellow photographer, a client looking for professional photography services, or someone who simply appreciates visual storytelling, I hope you find inspiration here. Stay tuned for new posts about my latest projects, favorite locations in Japan, and the stories behind my shots! 🚀📷

Screenshot 2025-01-01 at 0.24.40.png

Last spring, a couple messaged me forty minutes before their scheduled shoot near Shibuya to ask if I was "actually going to show up." They'd booked a photographer through a third-party site three months earlier, paid a deposit, and then watched the booking confirmation quietly vanish from their inbox two weeks before their flight. They found me on Instagram instead, at 6 a.m., in a park, hoping for the best. It worked out. It also shouldn't have been that hard.


The most reliable way to book a Tokyo photo session is to work directly with an independent photographer who publishes transparent pricing with no hidden fees, has reviews you can verify across more than one platform, responds in your language within 24 hours, and confirms your booking with a written policy rather than a chat message.

Why Booking a Tokyo Photo Session Feels So Complicated Right Now

Japan welcomed a record 42.7 million international visitors in 2025, a more than 15.8 percent increase over the previous record set in 2024, according to the Japan National Tourism Organization. That surge didn't just fill hotels and restaurants. It filled photographers' calendars too, and pulled a lot of new, unvetted operators into a market that used to be small enough for word of mouth to keep everyone honest.


Three things make booking a Tokyo photo session trickier than booking a walking tour:

  • You're usually booking from another country, in another time zone, with no way to meet the photographer or see their work in person before you pay.

  • Pricing across the market varies wildly, and few providers publish it upfront, so you're often negotiating blind.

  • Weather and crowd conditions in Tokyo change fast, and a photographer who can't flex around them will cost you your one shot at golden hour.

None of this means booking is risky. It means booking well requires a slightly different checklist than booking a hotel room.

How Do Tourists Choose a Reliable Photographer in Tokyo?

Start here, before you look at a single portfolio.

Cross-check reviews across at least two platforms. A photographer with reviews only on their own website isn't the same as one with matching reviews on Google, Instagram, and word of mouth. Consistency across platforms is a stronger trust signal than volume on any single one.

Reverse-image search a few portfolio photos. It takes thirty seconds and it's the single best defense against a "photographer" who's really a reseller using someone else's work. General travel-booking guidance backs this up. The Better Business Bureau's advice on avoiding vacation booking scams recommends going directly to a provider's own site rather than search ads, paying by credit card so charges can be disputed, and checking a provider's ratings and complaints before paying anything. That advice applies just as well to a photographer as it does to a tour operator.

Ask a specific question before you pay. A reliable photographer answers a specific question (backup plan for rain, number of edited photos, delivery timeline) with a specific answer. A vague reply to a specific question is the biggest red flag in this whole process.

Look for pricing and policies written down, not just discussed in a chat thread. It should state the date, time, location, hours booked, number of final images, and cancellation terms, before you send a deposit.

Confirm they specialize in tourists, not just local clients. Directing someone who's never modeled, doesn't speak Japanese, and has ninety minutes between two other plans is a different skill than photographing a local client who knows the city and has all day. I built my FAQ page around exactly this, since most of my clients are international tourists visiting for just a few days.

What Actually Makes a Tokyo Vacation Photography Service "The Best"?

"Best" gets thrown around a lot in this niche, so here's what it actually means in practice, based on running sessions across Tokyo, Kyoto, and Osaka.

Location knowledge that goes past the obvious three spots. Asakusa, Shibuya Crossing, and Tokyo Tower are the expected shots. A good photographer also knows Shinjuku Gyoen, Meiji Shrine, or the quieter side of a neighborhood most tourists never see.

Gear that holds up in Tokyo's actual weather. I shoot on a Sony A7 series body with G Master lenses, which matters more than people expect, since a full-frame sensor keeps skin tones flattering even under a flat, cloudy Tokyo sky, and a lot of vacation weeks don't line up with a sunny forecast.

Posing direction for people who've never been photographed professionally. Most tourists freeze in front of a camera or default to a stiff peace sign the second they hear the shutter. I've photographed enough jet-lagged couples at 6 a.m. to know that jet lag produces exactly two expressions: forced enthusiasm and quiet regret. My actual job is catching the three seconds between those two, when something real slips through.

A fast, honest turnaround. Every session I run is delivered as a private online gallery within 24 to 48 hours. If a service can't tell you when you'll receive your photos before you book, that's already an answer.

Genuine experience with families, not just couples. This part matters because it's often assumed to be a separate specialty. I run relaxed, playful sessions built around young children and babies, choosing family-friendly locations where kids can actually move instead of being asked to hold a pose.

Why Clear Pricing and Easy Booking Matter More Than You Think

This is the one area where the market genuinely sorts itself into two tiers. Tier one publishes a package you can read in under two minutes. Tier two makes you message first, wait a day, then negotiate a number that may or may not match what a friend paid for the "same" session last month.

Here's what a transparent structure actually looks like, using my own current pricing as the example:

Session

Duration

Locations

Edited Photos

Delivery

Price

Tokyo Session

1 hour

1 (Asakusa, Shibuya, Tokyo Station, Tokyo Tower, or Shinjuku)

60

Next day

$240 USD / ¥35,000

Tokyo Session

2 hours

2

120

Next day

$350 USD / ¥50,000

Engagement/Proposal

1 to 2 hours

1 to 2

60 to 120

Next day

$480 to $590 USD / ¥70,000 to ¥90,000

Kyoto, Osaka, Nara, or Mt. Fuji

1 to 2 hours

1 to 2

50 to 100

Next day to 1-2 days

$480 to $590 USD / ¥70,000 to ¥90,000

These sessions work equally well for a couple or a family. The difference is pacing, not price. A family session with young kids just gets directed differently than a couple session, not priced or timed differently by default. Full details live on my Prices page.


Which Tokyo Photo Session Services Work Best for First-Time Visitors?


First-time visitors need something slightly different from repeat travelers, mostly because they're juggling five other logistics at the same time as the shoot.

Look for a service that meets you near your hotel or a major station rather than requiring you to navigate to an unfamiliar neighborhood on day one. Look for a photographer who communicates entirely in your language from the first message through final delivery, with no translation gaps. I work with tourists visiting Japan for as little as a few days and handle the entire process in English, from that first message to the final gallery.


Why Do Visitors Struggle to Book Good Tokyo Photo Sessions?


Pull the previous sections together and the pattern is obvious. Visitors struggle because they're shopping in a market that grew faster than its own trust infrastructure. Demand jumped double digits in a single year, and supply followed, but not evenly. Some new entrants are excellent. Some are resellers or unlicensed operators borrowing someone else's photos. From another country, with no way to visit in person, it's genuinely hard to tell the two apart from a single Instagram grid.


The fix isn't complicated. It's the checklist above, applied before you pay: cross-platform reviews, a reverse-image search, a direct question with a specific answer, written pricing, and a written cancellation policy.


What About Couples, Proposals, Families, and Sakura Season?


The sections above cover the "is this trustworthy" layer. The "is this the right fit for my trip" layer depends on what you're actually booking.


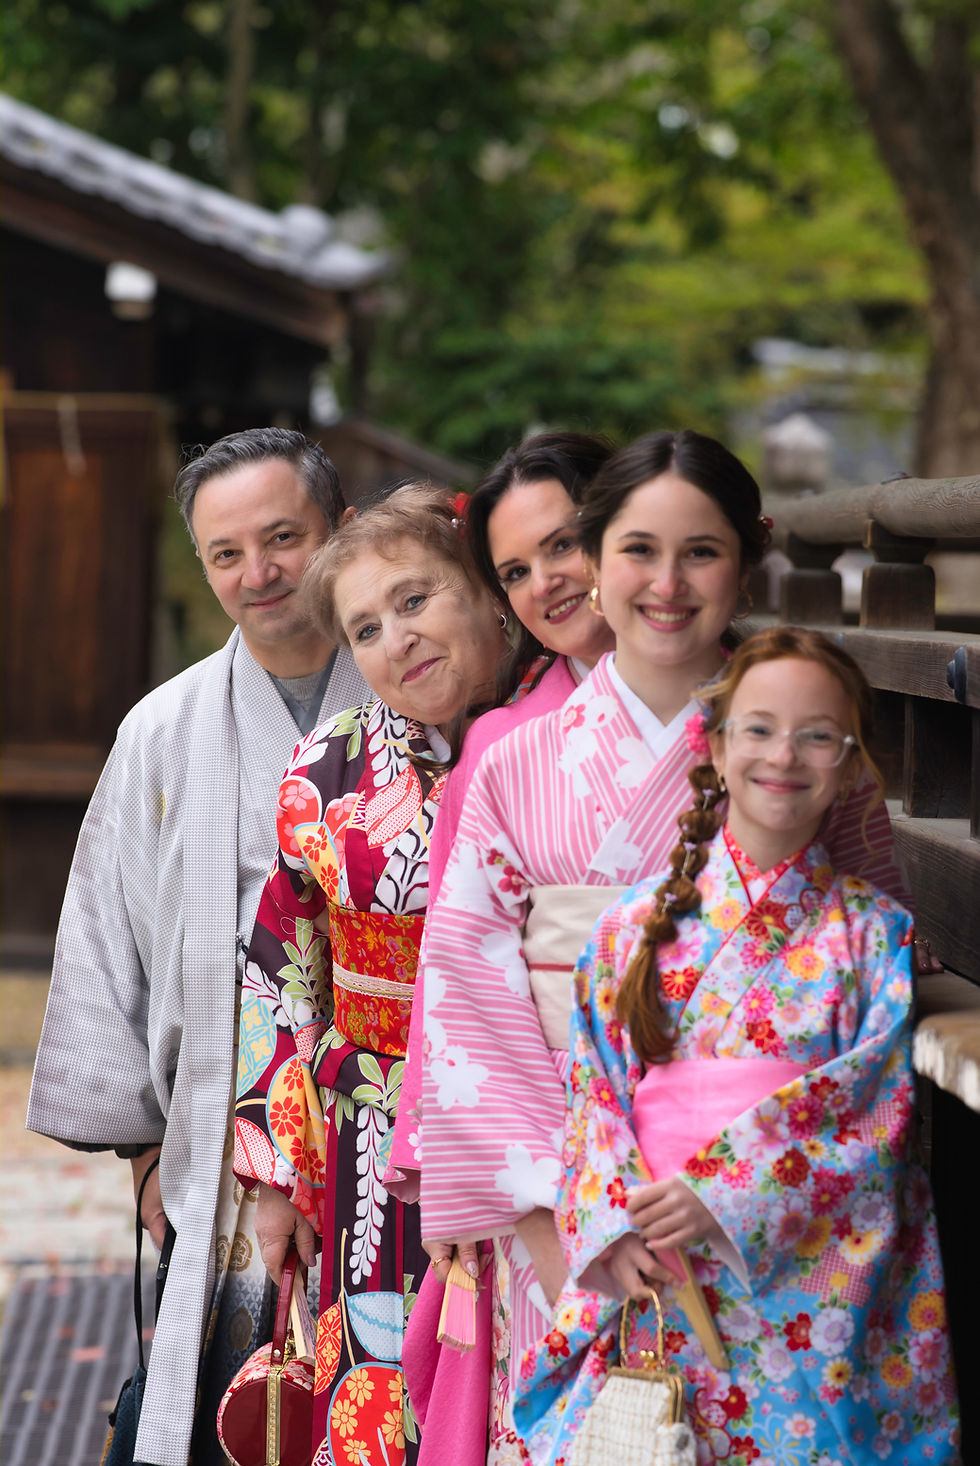
Proposal sessions need a photographer comfortable directing a nervous partner through a ring reveal without over-choreographing it into something that looks staged. I specialize in exactly this on my Proposal Photography page, and I can also help arrange a kimono rental if you want one in the shots, starting around ¥10,000.


Family sessions with young kids work best kept short, playful, and scheduled around a child's actual energy level rather than golden hour alone. If it starts raining mid-session, I either reschedule around my availability or shoot anyway using umbrellas and covered backup spots like cafes or architecturally interesting stations, so a forecast doesn't automatically cost you the day.


Sakura sessions need a photographer tracking the actual bloom, not the calendar date. Tokyo's cherry blossoms in 2026 were forecast to bloom around March 19 and reach full bloom around March 26, according to the Japan Meteorological Corporation's official cherry blossom forecast, in a window that typically lasts just seven to ten days. I recommend booking sakura and autumn foliage sessions 2 to 3 months ahead for exactly this reason. My guide to photographing Kyoto's Philosopher's Path goes deeper on timing a seasonal session specifically.


Common Mistakes to Avoid When Booking a Tokyo Photo Session


  • Paying a full deposit before seeing a written cancellation policy. Mine, for reference: same-day cancellations within 24 hours are charged in full, earlier cancellations on a paid-in-full session retain 50 percent, and a deposit alone is non-refundable. Whatever the specific terms, you should know them before you pay.

  • Trusting a single platform's reviews without cross-checking elsewhere.

  • Choosing the cheapest option in a market where "cheap" often means a reseller, not a discount.

  • Scheduling your shoot on day one in Tokyo, before jet lag has worn off. If nerves in front of the camera are a bigger worry than jet lag, my post on how to relax during a Japan photo session covers that specifically.

  • Assuming a beautiful Instagram grid is the same thing as a beautiful client experience. The two are related, not identical.

Frequently Asked Questions

Question: What are the top Tokyo photo session options for couples? Answer: Look for a photographer offering iconic backdrops (Shibuya, Meiji Shrine, Asakusa) alongside quieter alternatives, with enough time built in for two locations instead of rushing one. A 2-hour session covering two spots and delivering around 120 edited photos is a strong baseline for a couples session in Tokyo.

Question: What is the best Tokyo photo session for proposal shoots? Answer: The best proposal sessions are shot by photographers experienced at working covertly, positioned far enough away that the couple forgets a camera is there, with a backup location ready in case the first spot is unexpectedly crowded. Sessions built specifically around a ring reveal typically run 1 to 2 hours.

Question: Which Tokyo photo sessions work best for families with kids? Answer: Family sessions with young children work best kept relatively short, led by a photographer who directs playfully instead of asking for posed stillness, and scheduled with enough flexibility to reschedule or shift location if a child needs a break.

Question: Which Tokyo photo session services specialize in seasonal sakura shoots? Answer: Look for a photographer who tracks real-time bloom reports from the Japan Meteorological Corporation rather than booking by fixed calendar date, since Tokyo's peak bloom window typically lasts just seven to ten days and shifts every year. Booking 2 to 3 months ahead is standard for sakura season.

Question: How far in advance should I book a Tokyo photo session? Answer: For sakura or autumn foliage season, book 2 to 3 months ahead. For the rest of the year, 2 to 4 weeks is usually enough to secure a reputable, in-demand photographer.

Book too fast in Tokyo and you'll spend your vacation morning wondering if anyone is actually going to show up. Book with the checklist above (cross-platform reviews, a reverse-image search, a specific answer to a specific question, written pricing, a written cancellation policy) and a Tokyo photo session becomes what it should be: an hour or two of your trip that turns into the photos you actually look at for the next twenty years.


You relax in front of the camera by moving your attention off the lens and onto the person standing beside you. Arrive at the location 10 to 15 minutes early to get familiar with it, move through the session instead of holding poses, and focus on connecting with your partner, child, or family. The genuine expressions people love in their photos come from a real moment shared between two people, not from trying to look good for a camera.


Why "Just Be Yourself" Is Terrible Advice (And What Actually Works)

I've photographed more than 60 sessions across Tokyo, Kyoto, and Osaka, and almost every client says some version of the same thing before we start. "I'm not photogenic." "I don't know what to do with my hands." "I always look stiff in photos."

Here's the problem with the advice most photographers give in response: "relax" and "just be yourself." That advice isn't wrong, it's just useless, because it doesn't tell you how. Telling someone with performance anxiety to "just be confident" doesn't fix anything, it just names the problem back at them.

There's real science behind why some people photograph as tense and others photograph as at ease, and researchers have been studying it since the mid-1800s. In 1862, French neurologist Guillaume Duchenne discovered that a genuine smile activates two separate muscle groups: the ones around the mouth, which you can control, and the ones around the eyes, which you mostly can't. Decades of follow-up research, including studies published in the Journal of Personality and Social Psychology, confirmed that this eye-crinkle version, now known as the Duchenne smile, reads as authentic to viewers in a way a mouth-only smile never does. You cannot fully fake it. So the fix isn't "smile better." It's "feel something real, and let the camera catch it."

That's the entire philosophy behind how I run my sessions. Here's what actually works.

What Actually Relaxes You in Front of the Camera

1. Arrive Early and Explore the Location Together

Showing up right at your session time means you're rushed and unfamiliar with the space, and you get photographed in that state within minutes. Arrive 10 to 15 minutes early instead. Walk the location with your partner or family, point out details, take a few casual selfies before I even lift my camera.

I've watched this play out dozens of times at Fushimi Inari: couples who explore the lower torii gates together before we start shooting are already laughing and relaxed by the time I raise the camera. Familiarity with your surroundings shows up in your body language whether you notice it or not.

2. Wear Something That Makes You Feel Like Yourself

Don't dress for what you think looks good in photos. Dress for what makes you feel like the best version of yourself, just slightly elevated. For sessions in Japan specifically, I'd avoid busy patterns that compete with backgrounds like the traditional woodwork in Gion or the vermilion gates at Fushimi Inari, but beyond that, choose the colors and cuts that make you stand up straighter.

Confidence is visible. I've photographed families in full kimono rental and families in jeans and a t-shirt, and every set of photos that turned out well shared one thing in common: the people in them felt good in what they were wearing.

3. Give Yourself Permission to Be Imperfect

Perfectionism during a shoot creates tension, and tension shows up on camera as stiffness. I shoot on a Sony A1, which is capable of 30 frames per second continuous shooting with full autofocus tracking. That's not a spec I'm mentioning to show off, it's the actual reason you don't need to nail a pose. In a two-minute sequence I might capture 200 frames. Some will be goofy. A handful will be exactly right. That's the process working as intended, not a backup plan.

4. Focus on Connection, Not the Camera

During your session, look at your partner, hold your kid's hand, laugh at whatever's actually happening around you. I'll direct you when I need a specific shot, but most of the best frames happen in the gaps between direction, when you're genuinely looking at each other instead of at me.

A technically sharp photo of two people staring at a lens with practiced smiles is forgettable. A slightly imperfect photo of a couple cracking up together on the Philosopher's Path in Kyoto is something you'll actually want printed and hung on a wall. That gap is the Duchenne smile research playing out in real time: connection produces the eye muscle activation that a posed camera smile physically cannot fake.

5. Use Movement to Burn Off the Tension

I always try to build movement into every session. Walking, spinning, chasing after kids or dogs, it doesn't matter what the movement is, just that there is some. Movement is a well-documented way to lower cortisol and reduce stress. It also shifts your focus from internal self-monitoring (how do I look right now) to external stimuli (where am I putting my feet), and that shift is a big part of what makes people relax.

This isn't just something I've noticed anecdotally. A landmark meta-analysis published in Sports Medicine reviewed decades of exercise research and found that aerobic movement is consistently associated with reductions in anxiety, an effect that held up regardless of a person's age or health status. More recent research backs this up further: a 2026 systematic review in the British Journal of Sports Medicine found exercise to be one of the most effective tools available for reducing anxiety and depression symptoms, in some cases outperforming standard treatment approaches.

I see this play out constantly. Couples have told me they didn't even notice themselves relaxing until they were walking through Arashiyama's bamboo forest. At that point, they weren't thinking about smiling or posing. They were focused on not stepping off the path. That distraction is exactly what produces a relaxed, natural expression in a photo.

6. Give Yourself Time to Breathe

Every session has pauses built in. Use them to breathe, drink some water, and think about something other than how you look. Photos taken right after a genuine break are almost always noticeably different: looser shoulders, less tension in the jaw, smiles that look earned instead of held.

7. Reconnect With What You're Actually There For

Before your session, remember why you booked it. An engagement? A family trip? A milestone worth marking? Whatever it is, reconnect with that reason. The moment you lose sight of it, the nerves creep back in.

I've shot proposals where the couple started out visibly stressed, and then they remembered what the day actually meant. Their entire demeanor changed within seconds, and those moments were almost always the best of the entire session.

Here's something nobody tells you going in: the fear of looking unattractive in photos is often the exact thing that makes photos look unattractive. It's a closed loop. The way out isn't trying harder to "be natural," since fighting the tension just tightens it further. It's giving yourself something else to engage with besides the camera.

What to Do Before and During Your Session

Before:

  • Wear clothes that make you feel comfortable and confident, not clothes chosen specifically "for photography"

  • Arrive 10 to 15 minutes early to explore the area

  • Remind yourself why you booked this session

  • Take three slow breaths before we start shooting

During:

  • Don't stare at me, stare at the person next to you

  • Move. Walk, turn, run, don't freeze

  • If you take a break, use it to actually reset, not to check your phone

  • I'm shooting at 30 frames per second. One awkward blink isn't a disaster

Why This Typically Fails

Most of the time, clients struggle because they're working hard to control their nervous energy by controlling their pose. I've lost count of how many people I've worked with whose shoulders locked up, whose breathing paused, and whose smile got stuck in place a few seconds too long. On camera, all of that reads as exactly what it is: performance, not presence.

The second common mistake is treating the location like a backdrop instead of an experience. Clients who rush through Asakusa checking off a list of "must-have" shots, all while trying to capture every possible angle, tend to end up with technically fine but emotionally flat photos. Families and couples who instead slow down and actually enjoy a real moment together, while I happen to be there with a camera, are the ones who end up with images they actually want to frame.

Frequently Asked Questions Question: I'm naturally shy. Can I still get good photos?

Answer: Yes, and some of my favorite sessions have been with shy clients. Shyness usually resolves once you stop focusing on the camera and start focusing on the person you're with. Early arrival and movement help far more than any pep talk I could give you.

Question: How long does it usually take to warm up during a session?

Answer: Most clients relax noticeably within the first 15 to 20 minutes, especially when we start with a walking segment rather than posed shots. That's why I build movement into the beginning of every session rather than saving it for later.

Question: Should I practice poses beforehand?

Answer: I'd actually recommend against it. Rehearsed poses tend to look rehearsed. Practicing genuine relaxation, like a few slow breaths, works better than practicing a specific angle.

Question: What if I have a bad hair day or feel self-conscious that day? Answer: This happens more often than you'd think, and it's rarely as visible in the final photos as people fear. Connection and genuine expression carry a photo far more than any single detail of appearance on a given day.

Question: Do you edit out awkward expressions, or do I need to get it right in the moment?Answer: Shooting at a high burst rate means we're rarely relying on one single moment. Across a two-hour session we'll have hundreds of frames to choose from, so an off moment here or there isn't a problem.

Ready to Create Your Japan Memories?

If you're planning a photo session in Tokyo, Kyoto, Osaka, or anywhere across Japan, I'd love to help you create something you'll actually want to look at years from now. Whether it's a couple session, family portraits, or a milestone celebration, my job is to make the experience comfortable enough that you forget I'm even holding a camera.

Contact me for a free consultation and let's talk about what your session should look like.


Photograph philosopher's path in either early morning (between 6:30 am and 8:00 am) or late afternoon (from 4 pm to 6 pm), as these times offer the most gentle light and the fewest crowds along the 2km-long canal walk. The spring cherry blossom seasons in kyoto usually begin around early April and the fall colors peak in mid november, and each of those periods books out well in advance.


Over the course of my career photographing over sixty weddings and other sessions throughout Japan, i continue to find myself returning again and again to photograph sessions at philosopher's path. This is located in kyoto's historic Higashiyama district. A 2 km-long stone pathway follows a canal, which has hundreds of cherry trees planted along its length. The pathway runs between the temple Ginkaku-ji (also known as silver pavilion) at the northernmost point and the temple Nanzen-ji at the southernmost point.


The origin of the name comes from Nishida Kitaro (1870-1945), one of the most important thinkers of the twentieth century in Japan. He was said to be walking this same pathway every day while meditating to and from Kyoto University. The canal itself is part of the Lake Biwa Canal (biwako doro), a water carrying system completed in 1890 by engineers working during the meiji period. If you can catch it just as the morning fog is lifting from the water, this place will feel very much like shooting inside a painting.


Herein lies a complete guide to all of what i share with my couples prior to their sessions at philosopher's path: when should you plan to shoot? Which time of year fits your idea of perfection? How far ahead do you need to schedule your booking? And how do you get there? Whether you're scheduling a couple's session, a multi-generation family portrait session, or proposing to your partner, i've got the tips you'll want to help make the most of your experience.


Why is Philosopher's Path such a great location for a photo session?

Philosopher's path always provides me with some of the most honest and intimate photographs of any of my locations i've worked with in kyoto. There are three solid reasons for this: the canal creates natural leading lines through the frame that draw the viewer's eye through the image, the water reflects light to soften and flatter subjects' skin tones, and the environment naturally lends a feeling of relaxation to subjects.


That relaxed environment allows couples to really connect in front of the camera. The romantic atmosphere surrounding this location helps even the shyest couple loosen up almost immediately after arriving at philosopher's path. As a matter of fact, i have shot proposal scenes here where the scenery helped me create many of the elements needed to capture the emotional moment.


Families also love philosopher's path, as it provides a variety of backdrops and settings within close proximity to one another. There is enough space for children to run around and play while allowing them to easily settle down, and the quiet surroundings allow for true smiles rather than forced ones.


What is the ideal time to take pictures at Philosopher's Path?

Light is key when taking photographs at philosopher's path. I photograph at two optimal times and discourage my clients from taking photographs at a third.


Time window

What you get

Best for

Early morning, 6:30 am to 8:00 am

Empty pathway, soft directional lighting, fog off the water

My favorite time frame

Late afternoon, 4:00 pm to 6:00 pm

Low golden light, glowing reflections in water

Backlighted silhouette images, side-lighted detail shots

Mid-day, 11:00 am to 3:00 pm

Harsh overhead sun, hard shadows under eyes

Avoid these hours, unless you are willing to wait for late afternoon

During my morning shoots (early window) i'm able to achieve incredible detail in low-light conditions using my Sony A1 without pushing my ISO levels too high, and when i use my gm lenses i'm able to produce very soft and creamy bokeh. During my afternoon shoots (late window), due to low-angle sunlight hitting the water, i'm able to produce glowing reflection images of the water as well as detail shots of hair texture and clothing using backlighting and sidelighting techniques.


Quick confession from years of photographing sessions here: i have lost count of the number of couples who tell me they want to schedule their session at 10 am "so we can sleep in," then see the photos taken at noon and ask why everyone looks like they are squinting into an interrogation lamp. The light does not negotiate. Give me a 6:30 am alarm clock and i will give you magic. That is the trade.


Best season for photos on Philosopher's Path?

Each of the four seasons offers a unique perspective on this pathway. As such, your choice of season is based upon the atmosphere you wish to convey in your photographs.

Season

Window

Look & mood

Note

Spring

Late March to early April

Pink blossom tunnel with falling petals

Peak bloom typically mid-April, lasts approximately two weeks, crowded

Summer

May through August

Full green canopy, soft shade

Quieter than spring, very intimate

Autumn

September through November

Vibrant reds, oranges and golds

Peak color mid-November, crisp light, my second favorite season

Winter

December through February

Bare branches, clear light, occasional frost

Fewest tourists, reflective New Year's mood

The springtime blooms tend to steal the show. However, due to changing weather conditions each year, the date of the peak blooms can vary slightly. As such, i recommend checking the Japan Meteorological Corporation cherry blossom forecast prior to booking a specific date, as the blooming period can differ by up to seven days. In addition to being a great opportunity for photographing families walking down the path, the falling blossoms after the peak bloom give many of my favorite frames i've captured. Although Spring is my number-one choice, i find the fall season to be a close second when it comes to creating an emotional connection through photography. Fall provides a contemplative light, perfect for families. Winter mornings offer another secret for capturing family portraits, as they provide the opportunity for quiet and intimacy, with few people around.

One-hour session or two-hour session?

If you choose a 1-hour session you'll be able to visit three to four locations. I build in enough time for one wardrobe change and capture both posed and candid walking shots that offer a good variety without making anyone feel rushed.

With a 2-hour session, i believe you'll be able to fully experience and capture the beauty of the entire philosopher's path, including visiting all the smaller bridges and side streets, allowing for multiple wardrobe changes and providing a natural flow of shots: first, posed portraits; next, candid walking moments; and lastly, the more casual and intimate photos that occur when everyone forgets there's a camera present.

Getting to Philosopher's Path

At the northern end of the path lies Ginkaku-ji, known as the "Silver Pavilion" and a UNESCO World Heritage site. At the southern end lies Nanzen-ji, one of Kyoto's most historic and important Zen temples. Typically, i meet my clients at the Nanzen-ji entrance, as parking and train stations are closer. We then walk northward along the canal toward Ginkaku-ji.

Parking near Nanzen-ji costs approximately ¥1,000 per 2 hours. Alternatively, public transportation is convenient via the Tozai subway line to Keage Station, located only a short distance away from the southern entrance. Peak tourist hours are 10:00 am to 3:00 pm, especially during cherry blossom viewing times in Spring and foliage viewing times in autumn. This is precisely why early morning and late afternoon photo sessions will likely feel like you're experiencing philosopher's path alone.

Clothing and what to bring

Dress in solid colors or muted patterns that blend well with nature. Busy patterns will compete with your background and detract from your overall appearance. Wear comfortable walking shoes, as we'll be on our feet throughout the session. When shooting couples, match your clothing colors but avoid coordinating outfits too closely, as this creates visual balance rather than looking too similar.

Before arriving at your photo shoot:

  • Wear comfortable walking shoes for 1 to 2 hours along the path

  • Bring a lightweight jacket or sweater, as mornings may still be chilly in warmer weather

  • Include possible wardrobe changes in a 2-hour session

  • Arrive 10 minutes prior to your scheduled appointment time for a quick introduction and orientation

  • Bring water and any necessary personal belongings

  • Book early to secure a spot for Spring (check the Japan Meteorological Corporation cherry blossom forecast)

  • Confirm peak foliage timing for autumn

Why hire a professional photographer at Philosopher's Path?

While philosopher's path is visually stunning on its own merit, capturing its essence requires timing and technical expertise. A professional photographer is needed to capture the correct lighting and shadow combinations, proper placement and composition of the canal, water, and trees, and correctly timed candid moments. The Sony A1 and G Master lenses i use can accurately reproduce the detail of blossoms, the texture of water, and the genuine expressions on your faces, while producing high-quality prints suitable for framing.

Plan your Philosopher's Path photo shoot

Philosopher's path is open throughout the year, however popular dates become booked quickly. Spring cherry blossom photo shoots typically begin booking in January to March (usually 2 to 3 months in advance), and autumn foliage photo shoots generally fill up by August. If you are planning your trip to Japan for 2026, it is recommended you contact me as early as possible to ensure securing the desired date.

I am happy to assist you in capturing your special moment(s) here at philosopher's path, whether it be a couple session, family portrait, or proposal. Contact me today to discuss availability or book a complimentary consultation at Soredenacho photography and let's create memories you will cherish forever.


bottom of page