top of page

Blog

Welcome to the Soredenacho Photography Blog, where I, Nacho, share my experiences as a professional photographer based in Tokyo, Japan.


My passion lies in capturing authentic moments, whether through corporate event photography, portraits, landscapes, architecture, or street photography. This blog is where I document my journey, share insights from my photo sessions, and provide valuable tips on photography techniques.

​

What to Expect on This Blog

This blog will be a space where I share my experiences from photo sessions, discuss challenges I’ve faced, and provide behind-the-scenes insights. I’ll also share tips on camera settings, lighting techniques, composition, and post-processing.

​

Whether you're a fellow photographer, a client looking for professional photography services, or someone who simply appreciates visual storytelling, I hope you find inspiration here. Stay tuned for new posts about my latest projects, favorite locations in Japan, and the stories behind my shots! 🚀📷

Screenshot 2025-01-01 at 0.24.40.png

There's something transformative about wearing a kimono for the first time. I've watched countless clients step in front of my camera in full traditional dress—and the shift is immediate. Shoulders straighten. Confidence blooms. Suddenly, you're not just visiting Japan; you're becoming part of its centuries-old story. As a Tokyo-based photographer who's captured over 60 sessions across Japan, I can tell you that kimono photoshoots are where the magic of cultural immersion meets stunning visual storytelling.


Why Kimono Photography is Special


A kimono photoshoot isn't just about wearing beautiful clothing—it's about stepping into a different version of yourself. Whether you're an international visitor wanting to experience authentic Japan or a local reconnecting with cultural heritage, the kimono transforms the entire session into something deeply meaningful.


What makes these sessions special is the intentionality. Unlike casual vacation photos, a kimono shoot requires planning, cultural respect, and a photographer who understands how to capture both the garment's intricate beauty and the wearer's genuine emotion. I've photographed families in Kyoto's Gion district, couples at Fushimi Inari Shrine, and multi-generational groups at Senso-ji Temple in Tokyo—each session tells a unique story of connection to Japan.


What to Expect During Your Kimono Session


Let me walk you through a typical kimono photoshoot experience, because knowing what's ahead helps you relax and enjoy the moment.


The Preparation Phase (30-45 minutes): Most clients rent their kimono from a professional rental shop—I recommend booking 2-3 weeks in advance, especially during peak seasons. You'll arrive at the rental location where staff will help you into the kimono, adjust the obi (belt), and ensure everything sits perfectly. This process takes patience and care; there's an art to wearing a kimono properly. I always advise clients to arrive early so there's no rush. The rental staff are incredibly helpful, and this time is part of the experience.


The Session Itself (1-2 hours): Once you're dressed, we head to your chosen location. For couples, popular spots include the bamboo groves of Arashiyama in Kyoto, the vermillion torii gates of Fushimi Inari, or the historic streets of Gion. For families, Senso-ji Temple in Tokyo's Asakusa district offers stunning traditional backdrops with manageable crowds if you time it right.
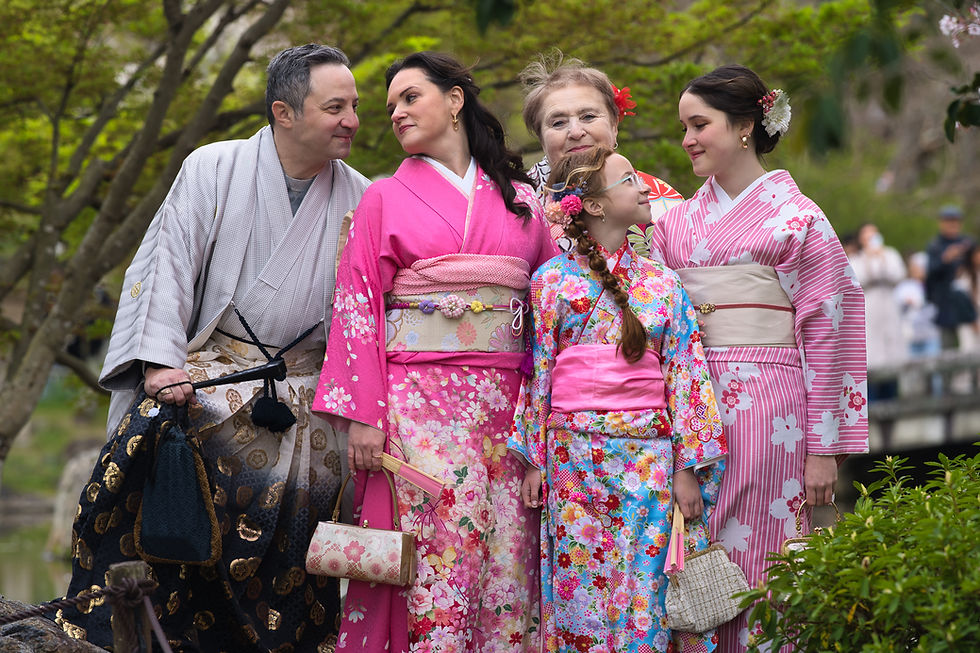


During the shoot, I focus on capturing both posed portraits and candid moments. The kimono's elegant lines photograph beautifully with my Sony A1 and G Master lenses—the tack-sharp detail preserves every intricate pattern in the fabric, while the natural bokeh creates that dreamy, cinematic quality that makes you feel like you've stepped into a period film.


The Return (15-30 minutes): After our session, we head back to the rental shop to return the kimono. Staff will help you change back into regular clothes. This is usually when clients tell me how different they felt wearing traditional dress—how it changed their perspective on the experience.


Choose Your Kimono Style: There are several options. Furisode (long-sleeved) kimonos are traditional for unmarried women and are absolutely stunning in photos. Yukata (casual summer kimono) are lighter and perfect for warm-weather sessions. Hakama (divided skirt worn over kimono) work beautifully for a more formal or samurai-inspired look. Discuss your vision with the rental shop—they'll guide you toward styles that flatter your body type and match your session goals.


Plan Your Location Strategically: I always recommend choosing locations based on the season and your comfort level. Kyoto's Philosopher's Path is magical during cherry blossom season but gets crowded. Fushimi Inari is stunning year-round but requires early morning (6-7 AM) to avoid tourist masses. Tokyo's Meiji Shrine offers a more serene experience with fewer crowds. For families, Senso-ji Temple provides iconic backdrops with good accessibility.


Timing Matters: Early morning sessions (6-8 AM) offer the best light and fewest crowds—especially crucial for kimono shoots where you want that peaceful, authentic atmosphere. Golden hour (late afternoon) creates warm, romantic lighting perfect for couples. Avoid midday harsh sunlight; it's unflattering for everyone, regardless of what you're wearing.


Footwear and Comfort: You'll wear traditional zori sandals or tabi socks with your kimono. These aren't designed for extensive walking. I recommend 1-hour sessions if you're concerned about comfort, or choose locations where we can move between nearby spots without excessive walking. I've learned to build in rest moments—we'll find a quiet shrine corner or garden bench where you can sit, breathe, and let me capture those peaceful, reflective moments.


Cultural Considerations and Respect


Wearing a kimono as a visitor to Japan is generally welcomed and appreciated—it shows respect for the culture. However, there are important guidelines:


• Wear it correctly: Work with professional rental shops that ensure proper fitting. Wearing a kimono incorrectly can be seen as disrespectful.

• Respect sacred spaces: In temples and shrines, be mindful of active worship areas. We'll photograph in appropriate locations and maintain respectful behavior.

• Avoid cultural appropriation: The goal is cultural appreciation and participation, not costume play. Approach the experience with genuine interest in Japanese traditions.

• Follow local customs: Remove shoes when entering certain areas, bow respectfully, and follow any posted guidelines.


In my 60+ sessions, I've found that clients who approach kimono wearing with genuine respect and curiosity have the most meaningful experiences—and the most beautiful photos.


Session Flow: 1-Hour vs 2-Hour Options


1-Hour Kimono Session: Perfect for couples or individuals wanting a focused experience. We'll shoot at one primary location (like Fushimi Inari or a specific temple area) with 3-4 different poses and settings. You'll get 50-80 edited photos. This works well if you're concerned about comfort in traditional dress or have limited time.
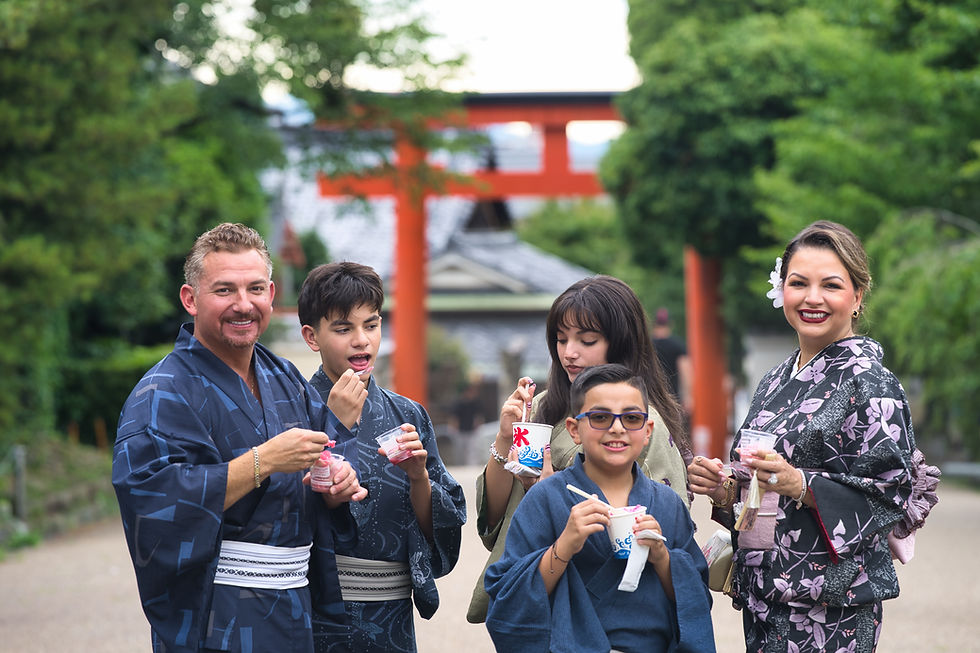


2-Hour Kimono Session: Ideal for families or couples wanting a more comprehensive experience. We can visit 2-3 locations (for example: start at a shrine, move to a garden, finish at a historic street) and capture a wider range of moments. You'll receive 100-150 edited photos showing different moods and settings. This allows for more candid moments and better captures the full experience of wearing kimono in Japan.


Real Examples from My Sessions


I photographed a family of four—grandparents, parents, and two children—all in coordinating kimonos at Senso-ji Temple during autumn. The grandmother, visiting from overseas for the first time, was initially nervous about the traditional dress. By the end of the session, she was laughing, posing naturally, and telling stories about wearing kimono as a young woman. Those candid moments between posed shots became her favorite photos—the genuine joy of three generations connected through tradition.


Another session featured an international couple who wanted to incorporate kimono into their engagement photos. We shot at Philosopher's Path in Kyoto during cherry blossom season. The soft pink blossoms, the traditional kimono, and their genuine affection created images that looked like they belonged in a fine art gallery. They printed a 24x36" canvas for their living room—a daily reminder of their Japan adventure.


Practical Preparation Checklist


✓ Book your kimono rental 2-3 weeks in advance

✓ Decide on session length (1 or 2 hours)

✓ Choose your primary location based on season and crowds

✓ Plan your outfit color/style with rental shop guidance

✓ Arrange transportation to rental location and photo location

✓ Wear comfortable, easy-to-remove clothing under the kimono

✓ Bring a small bag for personal items (rental shops usually provide storage)

✓ Plan for weather (rain backup locations, sun protection)

✓ Eat a light meal before the session (you'll be in the kimono for several hours)

✓ Arrive 15 minutes early to your session start time


Why Professional Photography Matters for Kimono Sessions


You could ask a friend to take photos, but here's what you'd miss: understanding how light interacts with intricate kimono patterns, knowing the best angles to flatter both the garment and the wearer, capturing authentic emotion rather than forced smiles, and having the technical skill to shoot in challenging temple lighting without harsh shadows or blown-out highlights.


My Sony A1 camera with G Master lenses handles these challenges beautifully. The advanced autofocus keeps your eyes tack-sharp even in dim temple interiors. The 50-megapixel resolution captures every detail of the kimono's weaving and patterns—perfect for printing large wall art. The low-light performance means I can shoot inside shrines and temples respectfully, without intrusive flash that disrupts the sacred atmosphere.


But beyond the equipment, it's about experience. I know which temples allow photography, which times have the best light, how to pose you so the kimono drapes beautifully, and how to make you feel confident and comfortable in front of the camera.


Booking Your Kimono Photoshoot


Ready to create your own kimono photography memory? Here's how we work together:


1. Consultation: We discuss your vision, preferred locations, session length, and any specific cultural experiences you want to include.

2. Planning: I'll recommend optimal timing, locations based on current season, and help coordinate with kimono rental shops I trust.

3. Session Day: We meet at your rental location, and I guide you through the entire experience with professionalism and warmth.

4. Delivery: You'll receive beautifully edited photos within 2 weeks, ready to share and treasure.


Kimono sessions typically run ¥45,000-¥75,000 depending on session length and location. Kimono rental (separate) is usually ¥10,000-¥15,000.


Final Thoughts


A kimono photoshoot is more than a photo session—it's a cultural experience, a confidence boost, and a way to create lasting memories of your Japan journey. Whether you're celebrating a special occasion, reconnecting with heritage, or simply wanting to experience Japan authentically, wearing traditional dress and having it professionally photographed is something you'll treasure for decades.

I've watched shy couples become confident, international visitors feel genuinely welcomed into Japanese culture, and families create heirloom photos that tell their unique story. That's what keeps me passionate about this work.


Ready to Create Your Kimono Memory?


Questions about kimono photoshoots? Wondering which location would be perfect for your vision? I'm here to help.


Reach out for a free consultation—let's plan your perfect session and create photos you'll treasure forever.


There's a moment in every photo session—that split second when your child glances toward the camera with genuine wonder, or your partner catches your eye with that unguarded smile. It's the moment that matters most. And here's what I've learned after 60+ sessions across Tokyo, Kyoto, and Osaka: if your eyes aren't perfectly sharp, the entire photo loses its magic.


That's where the Sony A1's advanced eye autofocus changes everything. Let me explain why this isn't just technical jargon it's the difference between photos you'll treasure forever and ones that end up in a forgotten folder.


The Problem Most Photographers Face (And How I Solved It)


When I first started photographing families and couples across Japan, I noticed a frustrating pattern. Even with careful focus, some shots would be slightly soft not obviously blurry, but not quite as sharp as they should be. The eyes, which are the emotional center of every portrait, would sometimes miss that perfect clarity.


This was especially challenging during my sessions at Fushimi Inari Shrine in Kyoto or inside the atmospheric temples of Asakusa. The lighting conditions shift constantly, subjects move unexpectedly, and you get one chance to capture that authentic moment.


Then I upgraded to the Sony A1, and everything changed.


What Eye Autofocus Actually Does (In Plain English)


Instead of me manually selecting a focus point or hoping the camera focuses on the right part of your face, the Sony A1's eye autofocus automatically detects and locks onto your eyes—even when you're moving, turning your head, or in challenging lighting.


Think of it like having an invisible assistant whose only job is to ensure your eyes are perfectly sharp. The camera uses advanced AI to recognize eyes and track them continuously, adjusting focus in real-time as you move through the frame.


In practical terms: I can focus on capturing your genuine emotion and natural expressions while the camera handles the technical precision. You get photos where your eyes sparkle with perfect clarity—that's where the real emotion lives.


Why This Matters for Your Japan Photo Session


I've photographed families at the Philosopher's Path in Kyoto during golden hour, couples at Shibuya Crossing with chaotic movement around them, and multi-generational families inside dimly-lit temples. In every scenario, eye autofocus has been transformative.


For Family Sessions: Kids move constantly. One moment your daughter is looking at the camera, the next she's distracted by a butterfly. With eye autofocus, I capture both moments with perfect sharpness. When you print that 24x36 wall portrait for your living room, every detail—from the sparkle in her eyes to the individual eyelashes—is crystal clear.


For Couple Sessions: The most powerful couple photos happen when you're genuinely connecting with each other, not staring at the camera. Eye autofocus lets me capture those stolen glances and intimate moments with both partners' eyes perfectly sharp, even when you're at different distances from the camera.


For Kimono Photoshoots: Traditional kimono sessions often happen in temples or gardens with mixed lighting—bright sunlight, deep shadows, and everything in between. Eye autofocus maintains perfect focus on your eyes regardless of the lighting challenges, ensuring that your expression and the intricate details of your kimono are both beautifully preserved.


Real Examples from My 60+ Sessions


Last month, I photographed a three-generation family at Meiji Shrine in Tokyo. The grandmother, mother, and two children were positioned at different depths, with dappled sunlight creating constantly changing light patterns. With traditional autofocus, I would have had to choose which person to prioritize. With eye autofocus, the Sony A1 tracked all their eyes simultaneously, giving me shots where every family member's eyes are perfectly sharp—capturing the genuine connection between generations.


Another session: a couple's surprise proposal at Arashiyama Bamboo Grove in Kyoto. The moment he got down on one knee, she turned away from the camera in shock, then back toward him. The eye autofocus tracked her eyes through that entire emotional sequence, capturing the exact moment her expression shifted from surprise to joy—all with perfect sharpness.


These aren't just technical achievements. They're the difference between a nice photo and a photo that makes you cry when you see it years later.


The Practical Impact: What You Actually See


When you receive your final photos, here's what eye autofocus means for you:


Larger Prints: Because every detail is perfectly sharp, you can confidently print large wall art—24x36, 30x40, even larger. The eyes remain stunning at any size.


Cropping Flexibility: I can crop photos tightly on faces without worrying about softness. Your favorite candid moment can become a stunning close-up portrait.


Emotional Impact: The human eye is drawn to eyes first. When they're perfectly sharp, the emotional connection is immediate and powerful. You feel the moment more deeply.


Timeless Quality: These aren't photos that will look dated in five years. The technical precision means they'll look as stunning in 2035 as they do today.


Why This Matters More Than You Might Think


Photography is about preserving memories. But it's also about preserving emotion. When your eyes are perfectly sharp in a photo, it's like the camera captured not just your appearance, but your presence—that intangible quality that makes you, you.


I've been photographing families and couples across Japan for years, and I can tell you with certainty: the difference between good focus and perfect focus is the difference between a photo you like and a photo you love.


That's why I invested in the Sony A1. It's not about having the fanciest camera—it's about giving you the best possible version of your memories.


What This Means for Your Next Session


When you book a session with me, you're not just getting a photographer. You're getting someone with professional-grade equipment specifically designed to capture the moments that matter most—with perfect technical precision and genuine artistic vision.


Whether you're planning a family portrait session in Tokyo, a couple's shoot in Kyoto, or a traditional kimono photoshoot in Osaka, you can trust that every eye will be perfectly sharp, every emotion perfectly preserved.


Ready to experience the difference? Let's create photos where your eyes—and your emotions—shine through with perfect clarity. Contact me for a free consultation about your Japan photo session, and let's plan something beautiful together.


Last spring, a couple messaged me forty minutes before their scheduled shoot near Shibuya to ask if I was "actually going to show up." They'd booked a photographer through a third-party site three months earlier, paid a deposit, and then watched the booking confirmation quietly vanish from their inbox two weeks before their flight. They found me on Instagram instead, at 6 a.m., in a park, hoping for the best. It worked out. It also shouldn't have been that hard.


The most reliable way to book a Tokyo photo session is to work directly with an independent photographer who publishes transparent pricing with no hidden fees, has reviews you can verify across more than one platform, responds in your language within 24 hours, and confirms your booking with a written policy rather than a chat message.

Why Booking a Tokyo Photo Session Feels So Complicated Right Now

Japan welcomed a record 42.7 million international visitors in 2025, a more than 15.8 percent increase over the previous record set in 2024, according to the Japan National Tourism Organization. That surge didn't just fill hotels and restaurants. It filled photographers' calendars too, and pulled a lot of new, unvetted operators into a market that used to be small enough for word of mouth to keep everyone honest.


Three things make booking a Tokyo photo session trickier than booking a walking tour:

  • You're usually booking from another country, in another time zone, with no way to meet the photographer or see their work in person before you pay.

  • Pricing across the market varies wildly, and few providers publish it upfront, so you're often negotiating blind.

  • Weather and crowd conditions in Tokyo change fast, and a photographer who can't flex around them will cost you your one shot at golden hour.

None of this means booking is risky. It means booking well requires a slightly different checklist than booking a hotel room.

How Do Tourists Choose a Reliable Photographer in Tokyo?

Start here, before you look at a single portfolio.

Cross-check reviews across at least two platforms. A photographer with reviews only on their own website isn't the same as one with matching reviews on Google, Instagram, and word of mouth. Consistency across platforms is a stronger trust signal than volume on any single one.

Reverse-image search a few portfolio photos. It takes thirty seconds and it's the single best defense against a "photographer" who's really a reseller using someone else's work. General travel-booking guidance backs this up. The Better Business Bureau's advice on avoiding vacation booking scams recommends going directly to a provider's own site rather than search ads, paying by credit card so charges can be disputed, and checking a provider's ratings and complaints before paying anything. That advice applies just as well to a photographer as it does to a tour operator.

Ask a specific question before you pay. A reliable photographer answers a specific question (backup plan for rain, number of edited photos, delivery timeline) with a specific answer. A vague reply to a specific question is the biggest red flag in this whole process.

Look for pricing and policies written down, not just discussed in a chat thread. It should state the date, time, location, hours booked, number of final images, and cancellation terms, before you send a deposit.

Confirm they specialize in tourists, not just local clients. Directing someone who's never modeled, doesn't speak Japanese, and has ninety minutes between two other plans is a different skill than photographing a local client who knows the city and has all day. I built my FAQ page around exactly this, since most of my clients are international tourists visiting for just a few days.

What Actually Makes a Tokyo Vacation Photography Service "The Best"?

"Best" gets thrown around a lot in this niche, so here's what it actually means in practice, based on running sessions across Tokyo, Kyoto, and Osaka.

Location knowledge that goes past the obvious three spots. Asakusa, Shibuya Crossing, and Tokyo Tower are the expected shots. A good photographer also knows Shinjuku Gyoen, Meiji Shrine, or the quieter side of a neighborhood most tourists never see.

Gear that holds up in Tokyo's actual weather. I shoot on a Sony A7 series body with G Master lenses, which matters more than people expect, since a full-frame sensor keeps skin tones flattering even under a flat, cloudy Tokyo sky, and a lot of vacation weeks don't line up with a sunny forecast.

Posing direction for people who've never been photographed professionally. Most tourists freeze in front of a camera or default to a stiff peace sign the second they hear the shutter. I've photographed enough jet-lagged couples at 6 a.m. to know that jet lag produces exactly two expressions: forced enthusiasm and quiet regret. My actual job is catching the three seconds between those two, when something real slips through.

A fast, honest turnaround. Every session I run is delivered as a private online gallery within 24 to 48 hours. If a service can't tell you when you'll receive your photos before you book, that's already an answer.

Genuine experience with families, not just couples. This part matters because it's often assumed to be a separate specialty. I run relaxed, playful sessions built around young children and babies, choosing family-friendly locations where kids can actually move instead of being asked to hold a pose.

Why Clear Pricing and Easy Booking Matter More Than You Think

This is the one area where the market genuinely sorts itself into two tiers. Tier one publishes a package you can read in under two minutes. Tier two makes you message first, wait a day, then negotiate a number that may or may not match what a friend paid for the "same" session last month.

Here's what a transparent structure actually looks like, using my own current pricing as the example:

Session

Duration

Locations

Edited Photos

Delivery

Price

Tokyo Session

1 hour

1 (Asakusa, Shibuya, Tokyo Station, Tokyo Tower, or Shinjuku)

60

Next day

$240 USD / ¥35,000

Tokyo Session

2 hours

2

120

Next day

$350 USD / ¥50,000

Engagement/Proposal

1 to 2 hours

1 to 2

60 to 120

Next day

$480 to $590 USD / ¥70,000 to ¥90,000

Kyoto, Osaka, Nara, or Mt. Fuji

1 to 2 hours

1 to 2

50 to 100

Next day to 1-2 days

$480 to $590 USD / ¥70,000 to ¥90,000

These sessions work equally well for a couple or a family. The difference is pacing, not price. A family session with young kids just gets directed differently than a couple session, not priced or timed differently by default. Full details live on my Prices page.


Which Tokyo Photo Session Services Work Best for First-Time Visitors?


First-time visitors need something slightly different from repeat travelers, mostly because they're juggling five other logistics at the same time as the shoot.

Look for a service that meets you near your hotel or a major station rather than requiring you to navigate to an unfamiliar neighborhood on day one. Look for a photographer who communicates entirely in your language from the first message through final delivery, with no translation gaps. I work with tourists visiting Japan for as little as a few days and handle the entire process in English, from that first message to the final gallery.


Why Do Visitors Struggle to Book Good Tokyo Photo Sessions?


Pull the previous sections together and the pattern is obvious. Visitors struggle because they're shopping in a market that grew faster than its own trust infrastructure. Demand jumped double digits in a single year, and supply followed, but not evenly. Some new entrants are excellent. Some are resellers or unlicensed operators borrowing someone else's photos. From another country, with no way to visit in person, it's genuinely hard to tell the two apart from a single Instagram grid.


The fix isn't complicated. It's the checklist above, applied before you pay: cross-platform reviews, a reverse-image search, a direct question with a specific answer, written pricing, and a written cancellation policy.


What About Couples, Proposals, Families, and Sakura Season?


The sections above cover the "is this trustworthy" layer. The "is this the right fit for my trip" layer depends on what you're actually booking.


Proposal sessions need a photographer comfortable directing a nervous partner through a ring reveal without over-choreographing it into something that looks staged. I specialize in exactly this on my Proposal Photography page, and I can also help arrange a kimono rental if you want one in the shots, starting around ¥10,000.


Family sessions with young kids work best kept short, playful, and scheduled around a child's actual energy level rather than golden hour alone. If it starts raining mid-session, I either reschedule around my availability or shoot anyway using umbrellas and covered backup spots like cafes or architecturally interesting stations, so a forecast doesn't automatically cost you the day.


Sakura sessions need a photographer tracking the actual bloom, not the calendar date. Tokyo's cherry blossoms in 2026 were forecast to bloom around March 19 and reach full bloom around March 26, according to the Japan Meteorological Corporation's official cherry blossom forecast, in a window that typically lasts just seven to ten days. I recommend booking sakura and autumn foliage sessions 2 to 3 months ahead for exactly this reason. My guide to photographing Kyoto's Philosopher's Path goes deeper on timing a seasonal session specifically.


Common Mistakes to Avoid When Booking a Tokyo Photo Session


  • Paying a full deposit before seeing a written cancellation policy. Mine, for reference: same-day cancellations within 24 hours are charged in full, earlier cancellations on a paid-in-full session retain 50 percent, and a deposit alone is non-refundable. Whatever the specific terms, you should know them before you pay.

  • Trusting a single platform's reviews without cross-checking elsewhere.

  • Choosing the cheapest option in a market where "cheap" often means a reseller, not a discount.

  • Scheduling your shoot on day one in Tokyo, before jet lag has worn off. If nerves in front of the camera are a bigger worry than jet lag, my post on how to relax during a Japan photo session covers that specifically.

  • Assuming a beautiful Instagram grid is the same thing as a beautiful client experience. The two are related, not identical.

Frequently Asked Questions

Question: What are the top Tokyo photo session options for couples? Answer: Look for a photographer offering iconic backdrops (Shibuya, Meiji Shrine, Asakusa) alongside quieter alternatives, with enough time built in for two locations instead of rushing one. A 2-hour session covering two spots and delivering around 120 edited photos is a strong baseline for a couples session in Tokyo.

Question: What is the best Tokyo photo session for proposal shoots? Answer: The best proposal sessions are shot by photographers experienced at working covertly, positioned far enough away that the couple forgets a camera is there, with a backup location ready in case the first spot is unexpectedly crowded. Sessions built specifically around a ring reveal typically run 1 to 2 hours.

Question: Which Tokyo photo sessions work best for families with kids? Answer: Family sessions with young children work best kept relatively short, led by a photographer who directs playfully instead of asking for posed stillness, and scheduled with enough flexibility to reschedule or shift location if a child needs a break.

Question: Which Tokyo photo session services specialize in seasonal sakura shoots? Answer: Look for a photographer who tracks real-time bloom reports from the Japan Meteorological Corporation rather than booking by fixed calendar date, since Tokyo's peak bloom window typically lasts just seven to ten days and shifts every year. Booking 2 to 3 months ahead is standard for sakura season.

Question: How far in advance should I book a Tokyo photo session? Answer: For sakura or autumn foliage season, book 2 to 3 months ahead. For the rest of the year, 2 to 4 weeks is usually enough to secure a reputable, in-demand photographer.

Book too fast in Tokyo and you'll spend your vacation morning wondering if anyone is actually going to show up. Book with the checklist above (cross-platform reviews, a reverse-image search, a specific answer to a specific question, written pricing, a written cancellation policy) and a Tokyo photo session becomes what it should be: an hour or two of your trip that turns into the photos you actually look at for the next twenty years.


bottom of page